How to manage variant matrices and bulk price updates in Shopware 6?
Quick Answer
Shopware 6 lets you build variant matrices through the Properties & Configurator system—you define property groups (Size, Colour, Material), generate all combinations, then deactivate the ones you don’t sell. For bulk prices, the fastest path is the Import/Export module with a variant CSV, though the Admin UI covers small-scale updates well enough. This page walks you through the full setup, the import workflow, and the mistakes that trip up most stores.
Before You Start
- ✦Shopware 6.4 or later — the Configurator UI changed significantly at 6.4; earlier steps will differ
- ✦Properties already created — your Size, Colour, etc. groups need to exist under Catalogues → Properties before you can assign them to a product
- ✦Admin access with product edit rights — Import/Export also requires the ImportExport permission, which is separate from the product permission
- ✦A staging environment for bulk changes — running a 5,000-row price import on production without testing it first is how stores end up with £0 prices in a flash sale
Create your property groups and values
Before you touch any product, set up your property groups here. Each group—Size, Colour, Material—is defined once and reused across every product that shares those dimensions. Setting the Display type to “Select” or “Colour” matters: it controls how the storefront renders the variant picker, not just the admin UI.
- Create a group (e.g. “Size”), set the sorting method to custom, then add each value (XS, S, M, L, XL) in the order you want them to appear on the storefront
- For colour swatches, set Display type to “Colour” and paste the hex code into each value—the picker will render as coloured circles automatically
- Save the group before navigating away—Shopware doesn’t auto-save property drafts
Assign property groups in the Configurator tab
Inside any parent product, go to the Variants tab and then Configurator. This is where you wire your global property groups to this specific product. Add each group you need and tick all the values that apply—the matrix will be generated from every combination of the values you select here.
- Click “Add property group”, search for the group you created, and select it
- Check the boxes for every value (size or colour) you actually stock—uncheck anything you’ll never carry
- Repeat for each dimension (Size, Colour, etc.) until all groups appear in the Configurator panel
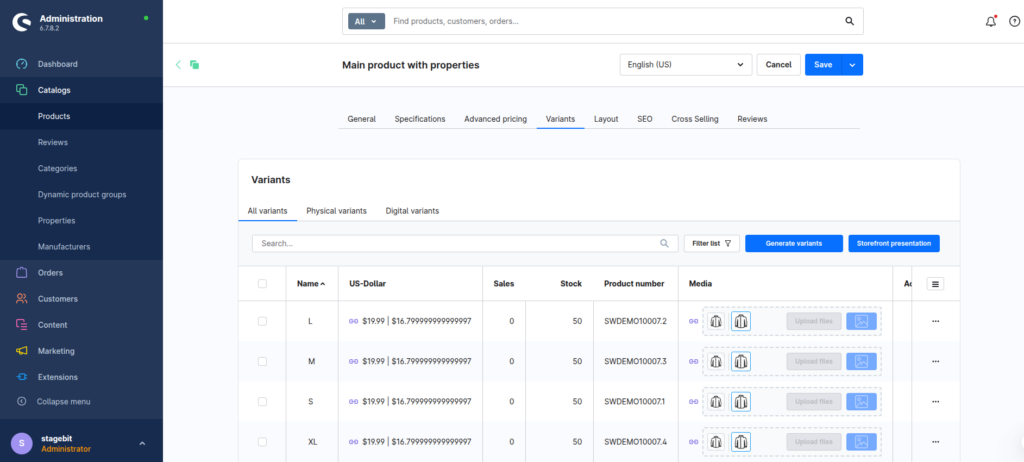
Generate variants and prune the matrix
Click “Generate variants” and Shopware creates every possible combination—three sizes and four colours gives you 12 variants. You’ll almost never sell all combinations, so the next job is cleaning up. Toggle the active/inactive switch on each variant row, or bulk-select rows and use the “Deactivate” action. Inactive variants still exist in the database but won’t appear in the storefront.
- Use the checkbox column to multi-select, then choose “Deactivate selected” from the bulk action dropdown
- Set stock to zero for out-of-season variants rather than deactivating them—this keeps the variant visible but out-of-stock, which is better UX than a broken URL
Set per-variant prices in the Admin UI
For products with fewer than 30 variants, the admin UI is perfectly usable. Click any variant row to open its detail panel and set the price there. If the variant price is left empty, it inherits from the parent product—which is exactly what you want for variants that share the same price. Only set a price override on the variant when it genuinely differs.
- Open a variant, scroll to the Prices section, and enter the gross price for each currency your store uses
- Use the “Price list” (volume pricing) table if you need tiered pricing at the variant level—e.g. 1–9 units at €19.99, 10+ at €16.99
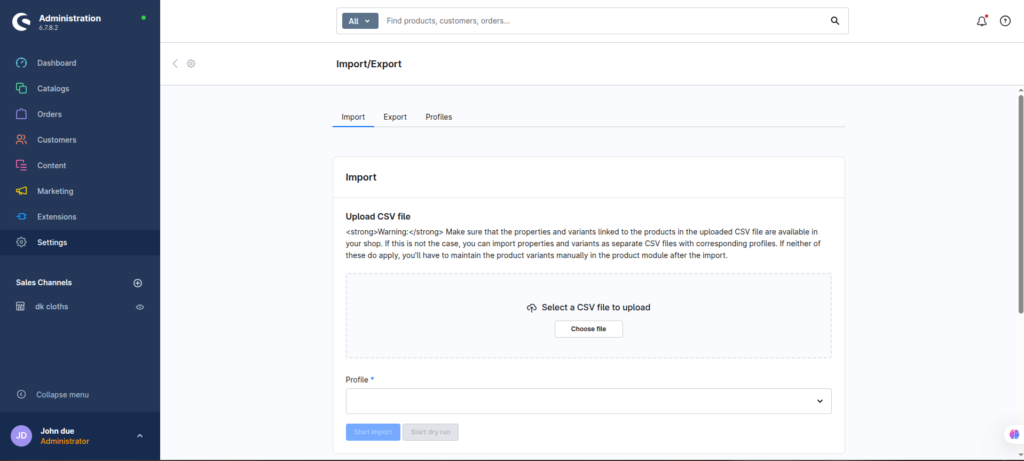
Export a variant CSV for bulk editing
Once you have hundreds of variants across dozens of products, the UI approach is too slow. Use the Import/Export module. Run an export using the default product profile—it will include a row per variant with the id, parentId, productNumber, and price.DEFAULT.net / price.DEFAULT.gross columns you need. Edit the prices in your spreadsheet tool, then re-import.
- Navigate to Settings → Import / Export, click Export, select the “Default product” profile, and hit Start export
- Download the CSV once complete—it’ll be in the Activity log tab
- Filter the spreadsheet to your target variants and update only the price columns—leave every other column untouched to avoid unintentional overwrites
Re-import the CSV to apply prices
Go back to Import/Export, switch to the Import tab, upload your modified CSV, and select the same profile you exported with. Shopware matches rows by id and updates only the fields present in the file. Run a small test batch—10–20 rows—on staging before going full scale on production.
- Upload the CSV, select the matching profile, and click “Start import”
- Monitor the progress bar—any row errors surface in the error log, not as a full failure
- After import completes, spot-check three to five variants in the storefront to confirm prices are live—Shopware’s HTTP cache can hold old prices for a few minutes
PRICE_DEFAULT_NET;PRICE_DEFAULT_GROSS—if you edit only one and leave the other stale, Shopware will import both values and your net/gross ratio will be wrong for every affected variant.Use the API for programmatic price updates
If you need scheduled price changes—e.g. a sale that kicks in at midnight—the Import/Export module isn’t the right tool. Shopware’s Admin API lets you PATCH the product entity directly with a new price payload. Pair this with a scheduled task or a webhook trigger from your ERP.
- Authenticate via
POST /api/oauth/tokenwith your integration credentials - Send a
PATCH /api/product/{id}request with only thepricearray in the body—you don’t need to send the full product payload - Use the
_info/versionendpoint to confirm API compatibility if you’re on a self-hosted instance running a custom version
PATCH /api/product/{variantId}
Content-Type: application/json
Authorization: Bearer {token}

{
  "price": [
    {
      "currencyId": "b7d2554b0ce847cd82f3ac9bd1c0dfca",
      "gross": 29.99,
      "net": 25.20,
      "linked": true
    }
  ]
}
Shopware Variant & Pricing Checklist
0 of 10 completeMatrix Setup
Pricing
Mistakes Most Developers Make
! Regenerating variants after the first save
What happens: Clicking “Generate variants” a second time creates new variant rows for any added values, but orphans the old ones rather than replacing them. You end up with duplicate variant rows sharing the same property combination.
Fix: After the first generation, add new values by clicking “Add variant” manually in the Variants tab, or delete the duplicate rows and clean up before re-generating.
! Editing the exported CSV in Excel and breaking encoding
What happens: Excel silently re-saves CSVs as Windows-1252 encoding, converting special characters (umlauts, accented letters) to garbled values. Import succeeds, but product names and descriptions are corrupted in the database.
Fix: Use LibreOffice Calc or Google Sheets to edit the CSV, or if you must use Excel, save as “CSV UTF-8 (with BOM)” and verify the encoding before importing.
! Leaving price empty vs. setting price to zero
What happens: Setting a variant’s price column to 0 in a CSV import tells Shopware the price is explicitly zero—the storefront renders a €0.00 price and the product is purchasable for free.
Fix: Leave the price column completely blank for variants that should inherit the parent price. An empty cell and a zero are not the same thing in Shopware’s import logic.
! Not flushing the HTTP cache after a price import
What happens: The import updates the database immediately, but the storefront cache still serves the old prices. Customer-facing pages can show the wrong price for 30 minutes or more, depending on your cache TTL.
Fix: After a bulk import, go to Settings → Caches & indexes and run “Clear cache” or invalidate only the affected category/product cache tags via the API if you need a surgical approach.
Key Takeaway
The short version: build your property groups globally first, wire them to the product via the Configurator tab, generate once, then prune. For pricing, the Admin UI is fine for small catalogues—but anything over 50 variants across multiple products belongs in a CSV import. The biggest gotcha is the difference between an empty price cell (inherits parent) and a zero price cell (overrides to free). Start with Step 1—getting the property groups right before you touch a product saves a painful rebuild later.
Related Answers
Still need help?
Talk to our Shopware experts
We've handled GDPR/CCPA compliance for dozens of EU & US Shopware stores.