How to enable PO number fields and cost‑center tracking in B2B checkouts?
Quick Answer
You can enable PO number fields and cost-center tracking in Shopware by extending the checkout form with custom fields, storing those values against the order entity, and exposing them to ERP or accounting integrations. Most B2B stores also add validation rules and approval workflows so buyers cannot submit incomplete purchasing data. The setup below covers both the admin configuration and the storefront implementation details developers usually miss.
Before You Start
- ✦ Shopware 6 admin access — you’ll need permission to create custom fields and edit checkout templates.
- ✦ B2B customer structure — this setup makes the most sense when buyers belong to company accounts or purchasing teams.
- ✦ ERP or accounting mapping plan — decide where PO and cost-center values should sync before development starts.
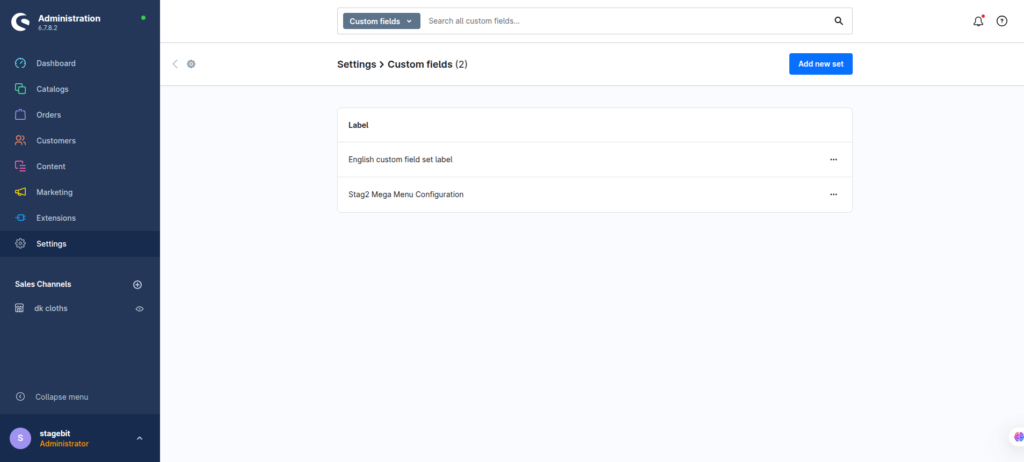
Create checkout custom fields
Start by creating custom fields for PO number, cost center, department code, or buyer reference. Attach these fields to the order entity rather than the customer entity if the values can change per purchase. Most B2B teams make the mistake of storing PO numbers on customer profiles—which breaks reporting later because every order ends up sharing the same value.
- Create a dedicated custom field set for B2B checkout data
- Use text fields for PO numbers and dropdowns for fixed cost centers
- Attach the field set to the order entity
Extend the checkout form
Next, expose those fields in the storefront checkout. Most stores handle this through a plugin or theme override using Twig template extensions. Keep the fields close to the order summary or payment section so procurement teams see them before submission. If you bury the inputs below optional comments, users skip them constantly.
- Extend the confirm page template
- Render custom input fields using Shopware form components
- Pass submitted values into the order payload during checkout
Add validation rules
B2B buyers usually cannot place orders without valid purchasing references. Add server-side validation for required PO formats, approved cost-center codes, and character limits. Client-side validation alone is not enough because API orders, punchout integrations, and automated procurement systems can bypass frontend checks.
- Require PO numbers for selected customer groups
- Validate cost-center values against approved lists
- Display clear validation messages before order placement
Expose data in admin
Once orders are created, purchasing data needs to stay visible for support, finance, and fulfillment teams. Add PO and cost-center values to the order detail view, admin grids, exports, and invoice templates. This is usually where operational teams notice the setup actually works—or discover the values disappeared after checkout.
- Display custom fields in the order administration panel
- Add values to PDF invoices and exports
- Include fields in customer service search filters
Connect ERP workflows
The final step is making the data usable outside Shopware. Most B2B stores sync PO and cost-center values into ERP, invoicing, or procurement systems through API integrations, middleware, or scheduled exports. Test this with real customer accounts before launch because formatting mismatches show up fast once accounting teams start processing bulk orders.
- Map custom fields into ERP payloads
- Test invoice generation with real procurement data
- Confirm values persist during refunds and reorders
Shopware B2B Checkout Checklist
0 of 6 completeMistakes Most Developers Make
! Storing data on customers
What happens: Orders lose historical purchasing accuracy because every transaction reuses the same PO value.
Fix: Save purchasing references directly against the order entity instead.
! Missing ERP mapping validation
What happens: Accounting exports fail because cost-center formats do not match ERP expectations.
Fix: Use controlled dropdowns or validation rules instead of free-text input where possible.
! Frontend-only validation logic
What happens: API-based orders bypass required PO fields entirely.
Fix: Add validation at the backend order processing layer as well as the storefront.
Key Takeaway
The short version: enabling PO numbers and cost-center tracking in Shopware is mostly about structuring order data correctly and making sure that data survives the full checkout-to-ERP flow. Create dedicated order-level custom fields, expose them in checkout, and validate them on the backend. Most problems happen after checkout—when invoices, exports, or procurement integrations cannot read the data consistently. Start with Step 1—that one alone handles most of it.
Related Answers
Still need help?
Talk to our Shopware experts
We've handled GDPR/CCPA compliance for dozens of EU & US Shopware stores.