How do I upload and optimize images for my Shopify store?
Images are important for your Shopify store. You can use them for product photos, banners, slideshows, logos, and blog posts. Shopify automatically optimizes images with its Content Delivery Network (CDN), so you don’t need to compress them manually.
Step 1 – Upload images in the theme editor
You can add images directly to your store through the theme editor or by uploading them in Content > Files in your Shopify admin.
To upload an image in the theme editor:
- Go to Online Store > Themes and click Edit theme.
- Select the page template or section where you want to add the image.
- In the Image field, click Select image > Add images, then choose the image from your computer.
- Or use free stock images from Shopify Burst: click Explore free images, select an image, and click Select.
- Click Save when done.
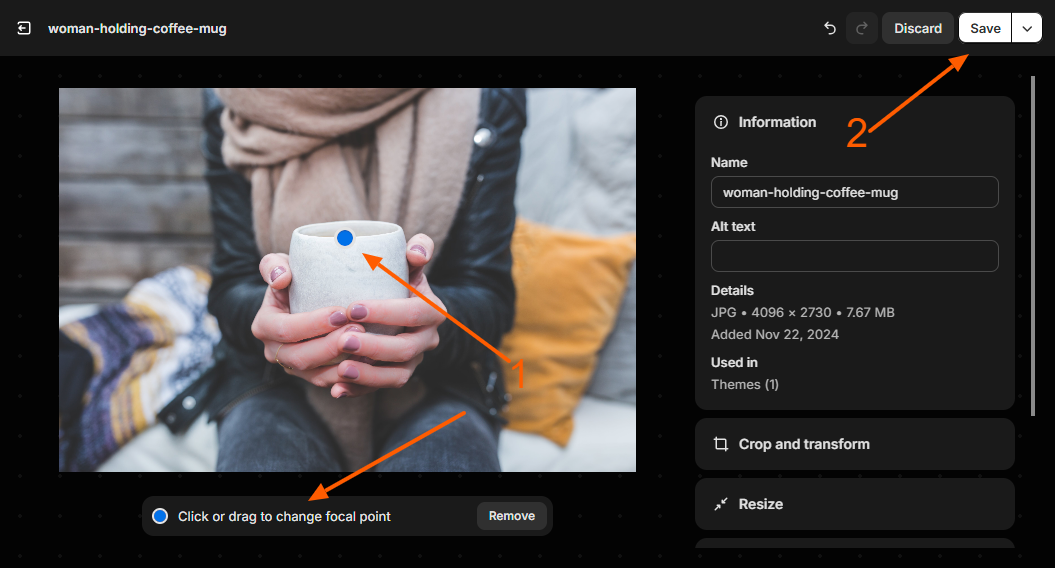
Step 2 – Use focal points for better cropping
A focal point defines the most important part of an image. Shopify will always keep this part visible, even when the image is cropped for different devices.
Steps to set a focal point:
- Click your image in the theme editor, Content > Files, or product media section.
- Click or drag the blue dot to the important part of the image.
- Click Save.
You can also remove or change the focal point anytime using the same steps.

Step 3 – Supported image formats
Shopify supports JPEG, PNG, GIF, HEIC, WebP and some other formats. JPEG is best for photos and complex images, while PNG works well for logos and graphics with flat colors or transparency.
Step 4 – Automatic optimization
Shopify automatically compresses images when serving them to customers to keep pages fast. It also chooses the best format based on the browser, including modern formats like WebP and AVIF. Animated GIFs may be converted to WebP for performance.
Step 5 – Image size and limits
Keep these limits in mind when uploading:
- Maximum resolution: 5000px x 5000px (25 MP)
- Maximum file size: 20 MB
If an image is too large in pixels but under 20 MB, resize it to reduce megapixels.
Step 6 – Color profiles
Shopify removes embedded color profiles (like .ICC or .ICM) when displaying images to ensure colors look consistent on all devices. You can remove profiles before uploading using image editing software like Photoshop or Illustrator.
Step 7 – Best practices for banners and slideshows
- Avoid placing text directly on large images—add text in the theme editor instead.
- Use simple images to make overlays and buttons easy to see.
- Wide images may crop on tall screens; tall images may crop on wide screens. Use focal points to control which part remains visible.
Step 8 – Improve loading speed with lazy loading
Shopify uses lazy loading to show a smaller version of images first while the full version loads in the background. This makes pages appear faster, especially for image-heavy stores.
✅ Result: By uploading high-quality images, using focal points, choosing the right format, and following best practices, your Shopify store will look professional, load fast, and display images beautifully across all devices.
Related Answers
Still need help?
Talk to our Shopify experts
We've handled GDPR/CCPA compliance for dozens of EU & US Shopify stores.