How do I create automatic collections based on conditions in Shopify?
Smart collections in Shopify help you automatically group products based on rules you set. Instead of adding products one by one, Shopify adds and removes products for you based on price, tags, stock, or other conditions.
How to create a smart collection in Shopify
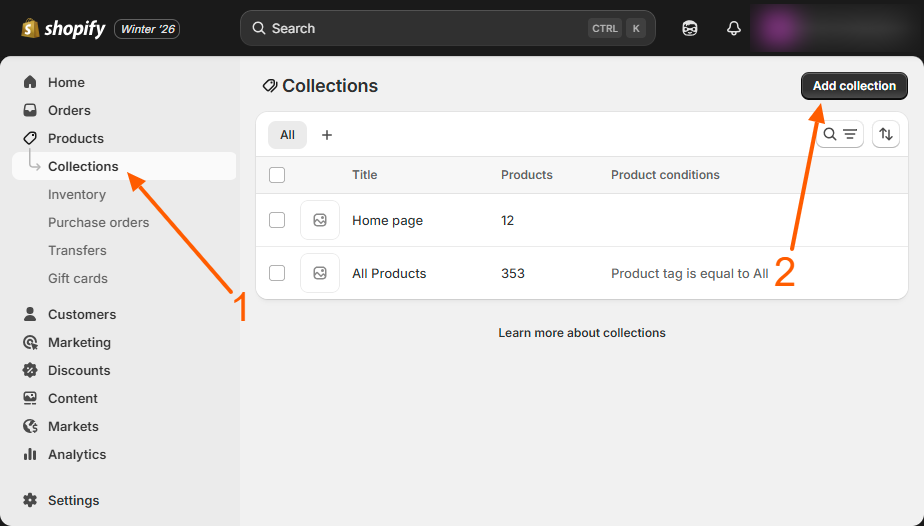
Step 1 – Open your collections
Log in to your Shopify admin and go to Products, then click Collections.
Step 2 – Add a new collection
Click Add collection to start creating a new collection.
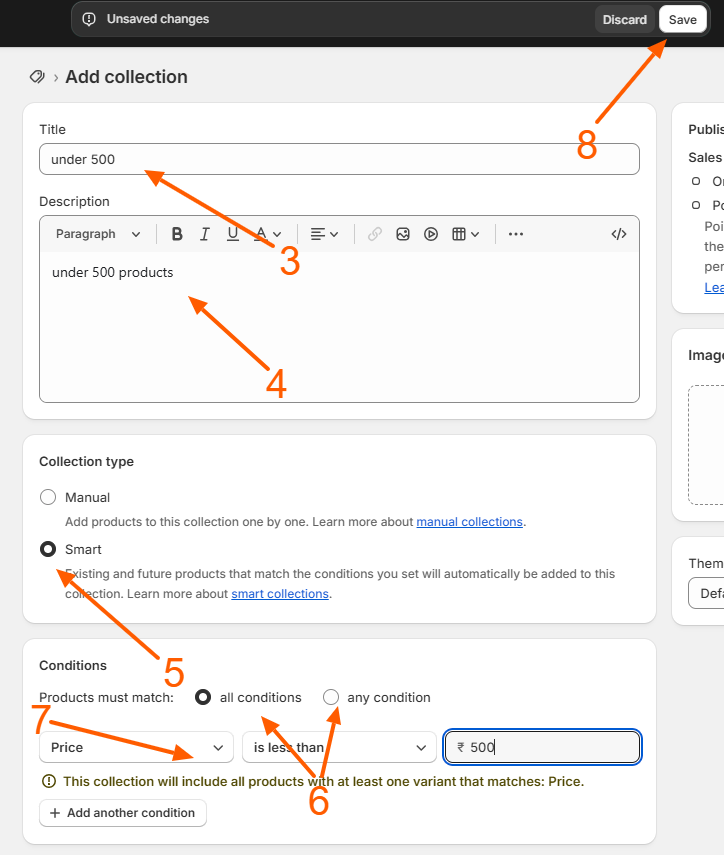
Step 3 – Enter collection details
Add a title and description for your collection so customers understand what it contains.
Step 4 – Choose Smart collection type
In the Collection type section, select Smart so Shopify can automatically manage products for you.
Step 5 – Set your product conditions
Choose the rules for adding products, such as Product tag, Price, Vendor, or Compare at price.
Step 6 – Select condition matching
Choose whether products must match all conditions or any of the conditions.
Step 7 – Save your collection
Click Save. Shopify will now automatically add matching products into your collection.
Example: Create a collection for products under a specific price
You can use a smart collection to automatically show only products that are below a certain price, such as items under ₹500. This is useful for budget collections, festival offers, or local deals.
Step 1 – Add a price condition
Go to the Conditions section and select Product price, then choose is less than and enter 500.
Step 2 – Save your collection
Click Save. Shopify will now automatically show only products that cost less than ₹500 in this collection.
Example: Create one collection from multiple collections
You can also group products from different collections into one main collection using tags.
Step 1 – Add product tags
Add tags like belt, hat, or scarf to your products.
Step 2 – Create smart collections for each tag
Create collections using Product tag is equal to belt or Product tag is equal to hat.
Step 3 – Create a main accessories collection
Create another smart collection and add conditions for all tags, then choose Any condition so all tagged products appear together.
Helpful tips
- Smart collections automatically update when products match your rules.
- You can link collections in your store menu so customers can easily find them.
- This is useful for seasonal sales, local festivals, and category-based shopping.
Smart collections are widely used by Shopify store owners and local businesses to organize products, highlight offers, and improve customer shopping experience without manual work.
Related Answers
Still need help?
Talk to our Shopify experts
We've handled GDPR/CCPA compliance for dozens of EU & US Shopify stores.